Wet Room and Shower Floors: The Advantages of Small Tiles on Slopes, Drains, and Curves
Posted by Dimai Kandi
Filed in Other 4 views
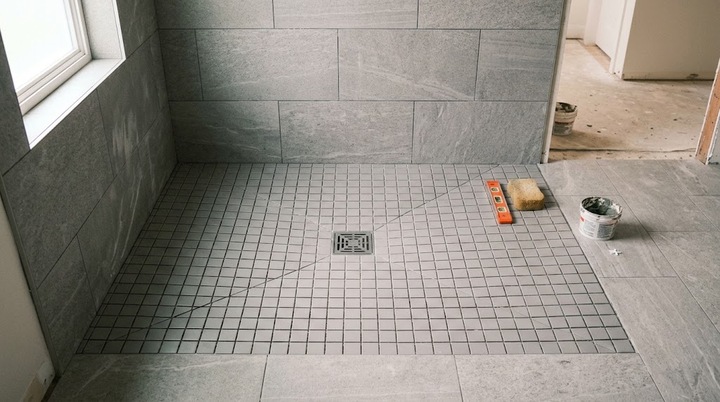
A shower floor or wet room is among the hardest jobs in tiling. You are not just covering a surface. You are shaping a plumbing fixture that must shed water on cue. It also needs grip under bare, soapy feet.
Large tiles look right on walls and open floors. Set one across a sloped pan and it resists the pitch. It bridges low spots and rocks on high ones. That tension is behind many wet-area failures.
Curbs, thresholds, and corners complicate the geometry further. Water must reach the drain without pooling anywhere on the way. A ceramic tile shop offers many sizes, but the floor pitch decides what works. Choosing with that in mind saves rework later.
Why Slopes Punish Big Tiles
Most shower floors need about a quarter inch of drop per foot. That pitch is what steers water to the drain. A typical four-foot-wide shower falls roughly an inch from wall to drain. It sounds small until you tile across it.
Place a 12x24 tile on that fall and it will not sit flat. The body is rigid, so it teeters on high spots. An edge lifts, creating lippage between neighboring tiles. Lippage trips feet and traps water and grout, which invites mold.
Even a 6x6 tile can prove too large on a steep pitch. Smaller units follow the fall easily because each barely flexes. The joints act like tiny hinges that let the floor bend. Mosaic floor tiles put that principle to work on mesh sheets.
The surface then sits where the pan wants it. High corners disappear and the slope stays even to the drain. That consistency keeps water moving and the floor predictable to walk on.
Where Small Tiles Earn Their Place
Sheet-mounted small tiles remove most lippage risk. The pieces arrive bonded to a mesh or film in a set grid. You press the full sheet into the thin-set at once. Each piece then settles to its own level along the slope.
Because each piece is small, it follows the floor's curve without resistance. You are not wrestling the material into position. Press the sheet, check the fall with a level, and continue. Mosaic floor tiles make this rhythm repeatable from one sheet to the next.
If a piece sits high, a grout float taps it down in seconds. Try that fix with a 12x24 slab and you are starting over. Sheets also keep spacing even across the whole floor. You get a surface that looks flat while still pitching correctly.
Grip and Safety Underfoot
Wet rooms stay wet by design, so slip resistance matters. Large polished tiles get slick the moment they are soapy. Small tiles offer one clear advantage: far more grout lines. Those lines are what your feet actually grip.
Grout channels create friction and give bare skin edges to hold. Even glossy glass or smooth stone gains traction from that density. Water sits in the channels instead of forming one continuous film. Mosaic floor tiles behave better underfoot than their surface finish suggests.
Breaking the surface film also reduces hydroplaning risk. The grout network scatters water into many small pockets. Feet meet edges more often than smooth, uninterrupted surface.
Handling Curves and Corners
Shower floors are rarely perfect squares in real bathrooms. Rounded curbs, curved benches, and custom drain bases all show up. Big tiles resist these shapes and need relief cuts to seat. Those cuts leave sharp edges and ragged lines.
Small pieces wrap a rounded curb with little effort. Where floor meets wall in an inside corner, they fold in neatly. There is no need to cut a thin porcelain sliver to fill a gap. The pieces fill the space as you press them down.
Less cutting means less waste and fewer interrupted layouts. Time shifts from saw work to bedding and slope checks. Corners come out cleaner because pieces meet instead of forcing miters.
Linear Drains and Wet Room Layouts
Linear drains changed how wet rooms get built. Instead of a round clamping drain, you get a long trench. The floor then slopes one way toward that trough. Single-plane falls are simpler to form and easier to waterproof.
That single slope still has to move water reliably. Large tiles fight the pitch here just as they do elsewhere. Drain grates also tend to sit flush with the tile surface. Small sheeted pieces run right up to the grate and meet it cleanly.
Fewer cuts at the drain line speeds up the layout. The tile-to-grate transition reads as one clean edge. Large tiles must each be cut to the exact trench width. An eighth-inch error shows at once, while small pieces absorb it.
Picking Materials and Backing
Shower floors need dense, water-resistant material above all else. Porcelain is the usual pick because it absorbs very little water. It also chips less readily than softer options under point loads. Choose a textured or unpolished finish where you can.
Glass mosaics look attractive and come in many colors. They can be slippery, so mixing glass with porcelain or stone helps. Using glass alone works better when the piece has a textured back. Staff at a ceramic tile shop can usually show you the backing.
Backing quality matters more than most shoppers expect. Film-backed sheets hold pieces perfectly flat until the mortar cures. Mesh-backed versions can sag into the thin-set and distort the slope. Ask at the ceramic tile shop which backing suits a sloped pan.
Peel film away only after the mortar has set. Then grout once the surface feels stable underfoot. Flex a sample sheet gently to see how the pieces stay aligned.
What Installation Actually Involves
Small tiles do not make the installation effortless. The substrate matters more than the tile itself. You need a properly pitched mortar bed or a pre-sloped foam pan. A poor pan cannot be corrected by tile choice.
Thin-set selection follows the tile type. Glass needs white mortar so the color does not read gray. Porcelain works well with a modified thin-set, and staff at a ceramic tile shop can confirm the bag. Press each sheet into the combed bed at the planned angle.
Then beat the sheets in with a grout float across the surface. This seats every piece and squeezes out trapped air. Check the fall with a short torpedo level as you work. Mark sheets that ride high or sit low before moving on.
Tap high sheets down while the mortar is still open. Lift low ones and adjust spacing so the grid stays continuous. The work rewards patience and a steady rhythm. Rushing here shows up later as lippage or ponding.
Grout Choices and Upkeep
Small tiles mean more grout, and more grout means more cleaning. That concern is fair, but it is manageable with the right products. Sealed cement grout works if you reseal it on schedule. It remains the option most people know best.
Epoxy grout or a single-component urethane grout resists staining without sealing. It costs more up front and takes care to install. Mildew has less to cling to on those surfaces.
Color choice affects upkeep as well. Pick a grout shade close to the tile color to hide uneven lines. With white tile, light gray reads clean and forgives soap film. Very dark grouts on floors show hard water spots quickly.
Work the joints flush and wipe diagonally across the pieces. Keep a second bucket of clean water for the final pass. Good tooling now saves scrubbing later.
Design Range of Small Tiles
Small tiles open design options that large slabs cannot match. Sheets arrive with blended colors already arranged. You can fade from a dark center toward a lighter edge. Shapes like hexagons and penny rounds mix easily.
The pattern looks complex, yet you set it one sheet at a time. That keeps layout time reasonable even on detailed floors. You can also run the same sheet up the wall as an accent band. Mosaic floor tiles tie the floor and wall together in one move.
One material across the room reads as a single considered surface. The same sheet can wrap a curb, a bench, and a niche lip. Fewer product types also means fewer leftover boxes.
A shower or wet room floor is the hardest part of the build. It must keep water out, guide water away, and keep you steady. Large tiles meet few of these demands on a sloped pan. They crack and lift where the geometry turns.
Small sheets follow the pitch and wrap the curves. They also add the grout density that keeps footing sure. Choose them for the wet floor and the rest of the job gets simpler. The finished room will be easier to live with.